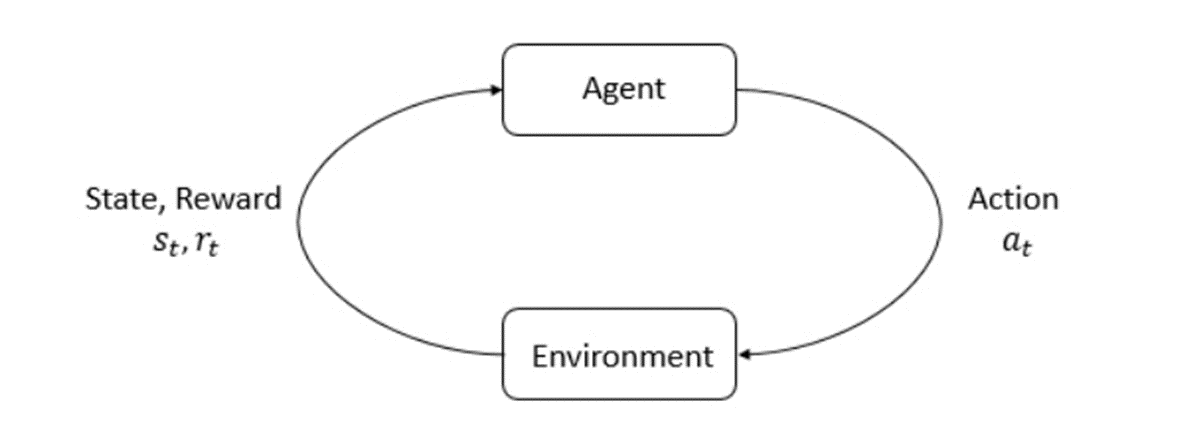
强化学习是机器学习的一个领域。它是关于在特定情况下采取适当的行动来最大化奖励。它被各种软件和机器用来找到在特定情况下应该采取的最佳行为或路径。强化学习与监督学习的不同之处在于,在监督学习中,训练数据具有答案键,因此模型本身使用正确答案进行训练,而在强化学习中,没有答案,但强化代理决定如何执行给定的任务。在没有训练数据集的情况下,它必然会从它的经验中学习。
强化学习(RL)是一门决策科学。它是关于学习环境中的最佳行为以获得最大的奖励。在 RL 中,数据是从使用试错法的机器学习系统中累积的。数据不是在有监督或无监督机器学习中找到的输入的一部分。
强化学习使用从结果中学习并决定下一步要采取的操作的算法。在每个操作之后,算法都会收到反馈,帮助它确定它所做的选择是正确的、中立的还是不正确的。对于必须在没有人工指导的情况下做出大量小决策的自动化系统来说,这是一个很好的技术。
强化学习是一种自主的自学系统,本质上是通过反复试验来学习的。它执行旨在最大化奖励的行动,或者换句话说,它是边做边学,以达到最佳结果。
1.理论基础
强化学习(Reinforcement Learning)的基本概念从马尔科夫决策过程(MDP)出发。MDP 是指在状态传播过程中遵循马可夫属性的过程。
2.强化学习算法:使用 Q 学习实现 Python
环境:jupyter lab
步骤 1:导入所需的库
python">#步骤 1:导入所需的库
import numpy as np
import pylab as pl
import networkx as nx
步骤 2:定义和可视化图形
python"># 步骤 2:定义和可视化图形
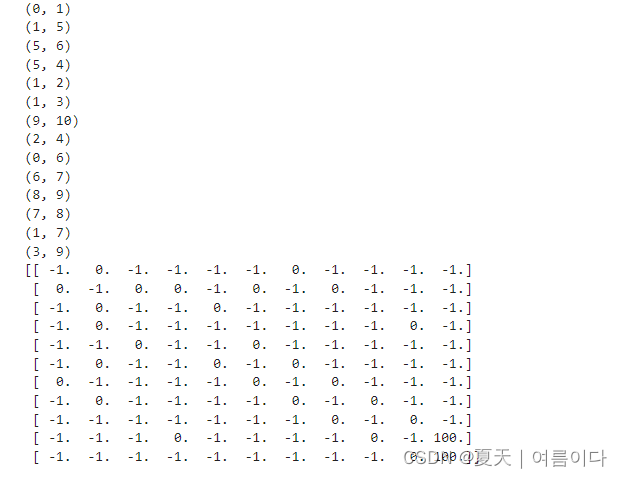
edges = [(0, 1), (1, 5), (5, 6), (5, 4), (1, 2),
(1, 3), (9, 10), (2, 4), (0, 6), (6, 7),
(8, 9), (7, 8), (1, 7), (3, 9)]
#
goal = 10
G = nx.Graph()
G.add_edges_from(edges)
pos = nx.spring_layout(G)
nx.draw_networkx_nodes(G, pos)
nx.draw_networkx_edges(G, pos)
nx.draw_networkx_labels(G, pos)
pl.show() 
#上面的图表在代码的复制上可能看起来不一样,因为python中的networkx库从给定的边缘生成一个随机图。
步骤 3:为机器人定义系统的奖励
python"># 步骤 3:为机器人定义系统的奖励
MATRIX_SIZE = 11
M = np.matrix(np.ones(shape =(MATRIX_SIZE, MATRIX_SIZE)))
M *= -1

for point in edges:
	print(point)
	if point[1] == goal:
		M[point] = 100
	else:
		M[point] = 0

	if point[0] == goal:
		M[point[::-1]] = 100
	else:
		M[point[::-1]]= 0
		# reverse of point

M[goal, goal]= 100
print(M)
# add goal point round trip
步骤 4:定义一些要在训练中使用的实用程序函数
python"># 步骤 4:定义一些要在训练中使用的实用程序函数
Q = np.matrix(np.zeros([MATRIX_SIZE, MATRIX_SIZE]))

gamma = 0.75
# learning parameter
initial_state = 1

# Determines the available actions for a given state
def available_actions(state):
	current_state_row = M[state, ]
	available_action = np.where(current_state_row >= 0)[1]
	return available_action

available_action = available_actions(initial_state)

# Chooses one of the available actions at random
def sample_next_action(available_actions_range):
	next_action = int(np.random.choice(available_action, 1))
	return next_action


action = sample_next_action(available_action)

def update(current_state, action, gamma):

    max_index = np.where(Q[action, ] == np.max(Q[action, ]))[1]
    if max_index.shape[0] > 1:
	    max_index = int(np.random.choice(max_index, size = 1))
    else:
	    max_index = int(max_index)
    max_value = Q[action, max_index]
    Q[current_state, action] = M[current_state, action] + gamma * max_value
    if (np.max(Q) > 0):
	    return(np.sum(Q / np.max(Q)*100))
    else:
	    return (0)
# Updates the Q-Matrix according to the path chosen

update(initial_state, action, gamma)
步骤 5:使用 Q 矩阵训练和评估机器人
python"># 第 5 步:使用 Q 矩阵训练和评估机器人
scores = []
for i in range(1000):
	current_state = np.random.randint(0, int(Q.shape[0]))
	available_action = available_actions(current_state)
	action = sample_next_action(available_action)
	score = update(current_state, action, gamma)
	scores.append(score)

# print("Trained Q matrix:")
# print(Q / np.max(Q)*100)
# You can uncomment the above two lines to view the trained Q matrix

# Testing
current_state = 0
steps = [current_state]

while current_state != 10:

	next_step_index = np.where(Q[current_state, ] == np.max(Q[current_state, ]))[1]
	if next_step_index.shape[0] > 1:
		next_step_index = int(np.random.choice(next_step_index, size = 1))
	else:
		next_step_index = int(next_step_index)
	steps.append(next_step_index)
	current_state = next_step_index

print("Most efficient path:")
print(steps)

pl.plot(scores)
pl.xlabel('No of iterations')
pl.ylabel('Reward gained')
pl.show()

步骤 6 :使用环境线索定义和可视化新图形
python"># 第 6 步:使用环境线索定义和可视化新图形
# Defining the locations of the police and the drug traces
police = [2, 4, 5]
drug_traces = [3, 8, 9]

G = nx.Graph()
G.add_edges_from(edges)
mapping = {0:'0 - Detective', 1:'1', 2:'2 - Police', 3:'3 - Drug traces',
		4:'4 - Police', 5:'5 - Police', 6:'6', 7:'7', 8:'Drug traces',
		9:'9 - Drug traces', 10:'10 - Drug racket location'}

H = nx.relabel_nodes(G, mapping)
pos = nx.spring_layout(H)
#nx.draw_networkx_nodes(H, pos, node_size =[200, 200, 200, 200, 200, 200, 200, 200])
nx.draw_networkx_nodes(H, pos)
nx.draw_networkx_edges(H, pos)
nx.draw_networkx_labels(H, pos)
pl.show()
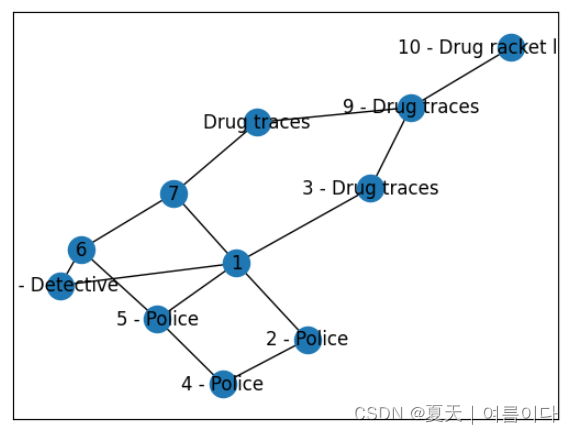
上图可能看起来与上一张图略有不同,但实际上它们是相同的图表。这是由于networkx库随机放置节点。
步骤 7:为训练过程定义一些实用程序函数
python"># 步骤 7:为训练过程定义一些实用程序函数
Q = np.matrix(np.zeros([MATRIX_SIZE, MATRIX_SIZE]))
env_police = np.matrix(np.zeros([MATRIX_SIZE, MATRIX_SIZE]))
env_drugs = np.matrix(np.zeros([MATRIX_SIZE, MATRIX_SIZE]))
initial_state = 1
# Same as above
def available_actions(state):
current_state_row = M[state, ]
av_action = np.where(current_state_row >= 0)[1]
return av_action
# Same as above
def sample_next_action(available_actions_range):
next_action = int(np.random.choice(available_action, 1))
return next_action
# Exploring the environment
def collect_environmental_data(action):
found = []
if action in police:
found.append('p')
if action in drug_traces:
found.append('d')
return (found)
available_action = available_actions(initial_state)
action = sample_next_action(available_action)
def update(current_state, action, gamma):
max_index = np.where(Q[action, ] == np.max(Q[action, ]))[1]
if max_index.shape[0] > 1:
max_index = int(np.random.choice(max_index, size = 1))
else:
max_index = int(max_index)
max_value = Q[action, max_index]
Q[current_state, action] = M[current_state, action] + gamma * max_value
environment = collect_environmental_data(action)
if 'p' in environment:
env_police[current_state, action] += 1
if 'd' in environment:
env_drugs[current_state, action] += 1
if (np.max(Q) > 0):
return(np.sum(Q / np.max(Q)*100))
else:
return (0)
# Same as above
update(initial_state, action, gamma)
def available_actions_with_env_help(state):
current_state_row = M[state, ]
av_action = np.where(current_state_row >= 0)[1]
# if there are multiple routes, dis-favor anything negative
env_pos_row = env_matrix_snap[state, av_action]
if (np.sum(env_pos_row < 0)):
# can we remove the negative directions from av_act?
temp_av_action = av_action[np.array(env_pos_row)[0]>= 0]
if len(temp_av_action) > 0:
av_action = temp_av_action
return av_action
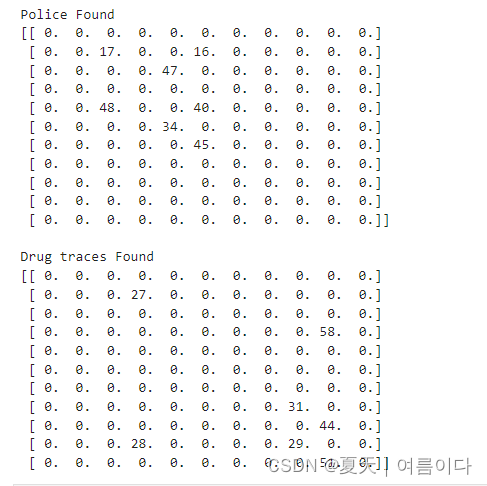
# Determines the available actions according to the environment 步骤 8:可视化环境矩阵
python"># 步骤 8:可视化环境矩阵
scores = []
for i in range(1000):
	current_state = np.random.randint(0, int(Q.shape[0]))
	available_action = available_actions(current_state)
	action = sample_next_action(available_action)
	score = update(current_state, action, gamma)

# print environmental matrices
print('Police Found')
print(env_police)
print('')
print('Drug traces Found')
print(env_drugs)
步骤 9:训练和评估模型
python">scores = []
for i in range(1000):
	current_state = np.random.randint(0, int(Q.shape[0]))
	available_action = available_actions_with_env_help(current_state)
	action = sample_next_action(available_action)
	score = update(current_state, action, gamma)
	scores.append(score)

pl.plot(scores)
pl.xlabel('Number of iterations')
pl.ylabel('Reward gained')
pl.show()
参考文献
【1】Part 1: Key Concepts in RL — Spinning Up documentation (openai.com)
【2】 BartoSutton.pdf (cmu.edu)
【3】 Reinforcement learning - GeeksforGeeks
【4】ML | Reinforcement Learning Algorithm : Python Implementation using Q-learning - GeeksforGeeks

![SNAP报错:No sigmaHHBand[0]](https://img-blog.csdnimg.cn/ac1fead5bc7a485cb74c2ec74879afa7.png)